How do you freeze brand a horse?
Freeze brands help with breeding and training program recognition, can identify stolen horses and if done well, can look sharp. Initially introduced by Dr. R. Keith Farrell in 1966 at Washington State University, freeze branding was first intended to replace hot branding of cattle and reduce scarring in hides for the sake of more useable leather.
Today, though, the practice of freeze branding cattle today remains secondary to traditional hot brands while the horse industry has taken the lion’s share of business due to its readability, minimal scarring and more complex designs.
While this is an all-encompassing look at freeze branding horses, local laws and regulations vary across the U.S. and change occasionally. Consult a local agriculture extension agent for more information.

How it (Generally) Works
Anatomy
To keep it basic, each horsehair contains a follicle for growth and a follicle for pigment.
Branding
With the application of an intensely cold branding iron, it is possible to destroy the color-producing pigment follicle and leave the growth follicle intact. The hair that will then be produced will grow white, permanently, which contrasts really well on solid-colored horses: bays, blacks and sorrels.
On light-colored horses, like whites and greys, the chilled iron can be applied for an extended period of time to create a “bald” brand, in which both the pigment and growth follicles are destroyed, and no hair will be produced.
Post-Branding
When the iron is removed from the horse, you will immediately see an indentation of the brand, which will swell within a few minutes. On average, the swelling will go down and the brand will seem to disappear in a few days. A few weeks out, the branded skin will slough off and hair growth will resume. Within a few months, a white brand will grow in.
The Inside Scoop
Unfortunately, there’s no one specific set of rules that will spare you the process of freeze branding trials and errors. In fact, this is a process full of variables and options at every step. Nonetheless, these tips should get you going in the right direction.
The Irons
The consensus is out: copper, copper alloys and brass irons will help you achieve the best freeze brand results. Pick an iron that is deep, wide, and thick enough to maintain and transfer the cold temperatures required to kill the pigment follicles.
“I prefer the commercially made brass irons,” explained veterinarian and team roper Wade Shoemaker of Countryside Vet in Greeley, Colorado, “because they seem to hold the cold the best and transfer the cold the best. It’s problematic when somebody’s pretty handy and wants to build his own out of stainless steel or a mild steel. Those, you have to apply the iron for a longer period of time to get the same effect as the good commercially produced irons.”
Justin Young of Young Dental in Arizona specifically recommends freeze-branding irons from L+H Branding Irons in North Dakota.
“That’s what I use and that’s what I recommend because that’s what they specialize in. I’ve had the best luck with L+H Brands.”
How To Freeze Brand
Chill the Irons
• Submerge them in the chosen coolant at least 1 inch deeper than the iron heads.
• Coolant will appear to boil. When the boiling subsides, the irons are as cold as the coolant and ready for use.
• While the irons are cooling, sedate the animal if using that form of control.
• Identify brand location on animal.
Dry, Clean and Clip
• Branding site must be dry and clean of debris.
• Clip an area just large enough for the brand, being careful to create straight lines and square corners.
Soak
• Soak clipped branding site with 99.9% alcohol (room temperature) and wipe away remaining clipped hairs.
• Soak again to remove naturally occurring oils and to help conduct cold temperature from iron to hide.
Brand
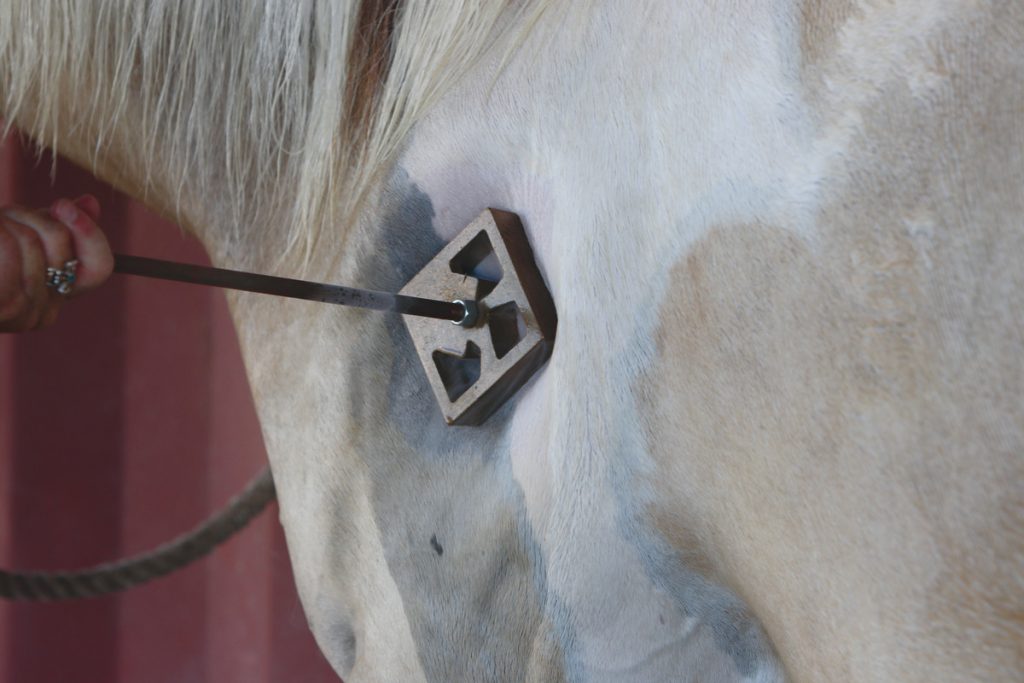
• Quickly apply iron to soaked brand site, taking (efficient) care to place brand squarely.
• Start the stopwatch and hold brand for appropriate time, rocking slightly and applying 35–40 pounds of consistent pressure without causing the skin to wrinkle.
• Cool the iron for additional use.
Necessary Tools
- Two people, minimum
- Cooler/bucket, in which standing irons can be submerged in coolant
- Coolant: liquid nitrogen or dry ice and alcohol
- Way to control horse: twitch or sedative
- Electric clippers (surgical blade)
- Brush and/or rag
- Stopwatch/timer
- 99.9% alcohol
- Branding irons
Recommended:
• Gloves
• Note recorder
• Fire extinguisher
Branding Times
Your branding iron manufacturer is a great resource for guidance on how many seconds the iron should be applied to the horse, which can range from six to 60 seconds. Remember, a superior and/or thicker iron will decrease the amount of time necessary, and so will thin skin—think branding the cheek as opposed to branding the hip or butt.
Additionally, your choice of coolant will also affect your timeline, with liquid nitrogen requiring somewhere around half the application time as dry ice and alcohol.
Young, who uses the dry ice method to cool his clients’ irons, estimates a 40-second application time average.
Shoemaker, who uses liquid nitrogen, believes 15 to 25 seconds is the window of time that results in a good brand for the majority of horses he services.
Roans
To add to the list of variables that may affect your horse’s brand, color should also be considered. On one end of the spectrum lie your basic bays, blacks and sorrels, which present little challenge to the process. On the other end lie the whites and light palominos or greys, which won’t show a white brand. Then, in a category of their own are the roans.
As Shoemaker explained, “The roan horses can be problematic for two reasons. First, when you irritate the pigment in the skin, it can come back as a darker color on like a red roan type horse. The other thing with the red roan is, if you clip those horses, it changes the pigment of the hair, so you can always see a clip box.”
Brand Location
The absolute first step in choosing your brand location is knowing your brand laws. Again, each state has their own version of the rules, which can prohibit you from branding certain areas (like the jaw), limit you to one area of the body, or give you unrestricted free rein to apply your brand to the location of your choosing, even if you branded your last horse on a completely different location.
Also be aware of your animal’s body condition specific to that area of the body. For instance, while the cheek will provide a consistent surface on which to apply the iron, body mass can change dramatically on the shoulder, which is both muscular and bony.
Caring for the Site
A close clip is required to best enable the transfer of the cold to the skin. Additionally, it is also recommended to take care when clipping a square big enough to accommodate the iron, so that it can also help you place your brand squarely.
“I always clip them with some sort of straight edge, like a long level or something to give you a straight line,” Young shared. “Then I clip just big enough for the brand to go, but I try to make sure the horse is square and balanced and then I do my outline with my clippers and have a good idea of where to put the brand.”
It’s also recommended that the horse is free of dirt and debris, as well as dry, so that the iron won’t freeze to the horse’s water-soaked skin. Instead, use 99.9% alcohol to soak the clipped site and wipe away any oils and residual debris. Soak the site again just before applying the iron so that the alcohol will aid in the transfer of the cold, without the risk of changing properties like water will.
Post-branding, Young also suggests applying a salve to the brand.
“After about two or three days, I start putting some of that Corona (Multipurpose Ointment) on it every day. The brand scabs and falls off, and it just speeds that process up, I think. I’ve recommended it to a few people, and they thought it worked well, also. I like the Corona because it’s real sticky and you don’t have to do it every day, but any kind of salve like that would probably be sufficient.”
When to Brand
To be clear, freeze branding can be done at any age and any time of year. (The rules do change a bit if you’re wondering what role seasons play in freeze branding a few hundred head of cattle.) That said, the seasons can affect how long it will take for your horse’s brand to grow in. A horse clipped and branded when the hair is in a growth stage (spring or fall) should require fewer weeks for a finished brand to appear.
Shoemaker suggests timing your branding to coincide with another service.
“Personally, my colts won’t get branded until I bring them in to float their teeth before I start putting the first rides on them as 2-year-olds—so, while they’re [sedated]. That’s just my personal program. Yesterday, we branded some cutting-bred long yearlings. So they’d been brought in, gentled, halter broke and, then, they come in to get their preliminary x-rays to make sure there’s nothing surgical we need to worry about before they start riding them and that’s when we brand a lot of those type horses.”
Restraining Your Horse
When Dr. Farrell presented his freeze branding technique, he did so with the claim that freeze brands are more humane than traditional hot brands.
Even with less pain involved, it is important to be able to maintain consistent pressure on the iron while branding without losing the placement of your brand due to a reactive horse. Young relies on a twitch and warns against the use of stocks.
“I’ve had the best luck using a twitch. I worry about the stocks because if one really wants to fight, I’ve seen them get hurt. A veterinarian might want to sedate the horse, and that would probably be the best, but I’ve branded a couple hundred head. If I’m branding the hip, I put his nose in the corner. If it’s the shoulder, I put his butt in the corner and just twitch them. If they move, that’s okay, I just move with them. I’ve found it to be the best method for me.”
Shoemaker agrees with Young—sedation is best.
Record Keeping
Unless you’re operating a major breeding operation, chances are pretty good you’re not branding horses on the regular. Because there’s so much trial and error involved in dialing in your process, and because it’s unreasonable to think you may remember that you applied your new iron for 24 seconds two years ago, taking notes is a best practice.
Make note of your choice of coolant and other materials/ingredients, the age and color of your horse, the time of year and the exact number of seconds the iron was applied.
To get the most accurate read on the seconds, designate a timer. The brander says “go” when they place the brand on the horse. The timer watches the clock and says “stop” when the pre-determined amount of time is reached. If contact with the horse is broken before time is up, the brander says “stop” at that time.
“When I freeze brand one, we put in the system that horse’s name and how many seconds we held the iron on,” Shoemaker said. “The other thing we’ll do is put a piece of tape on the freeze brand. If I keep a little cheat sheet with the iron—and the easiest way to do that is to tape it on there—then two years from now, they go and get the iron and say, okay, the last horse we branded was sorrel and we held it on for so many seconds. How did that brand turn out? Good? Or, it was a little light, so we’re going to hold the iron a little longer on this sorrel horse.”
This or That?
Dry Ice and Alcohol or Liquid Nitrogen?
Dry ice and alcohol (isopropyl, methyl, ethyl or acetone) are easily accessible and inexpensive. For a few dollars per pound, you can get dry ice from the grocery store and alcohol from your home improvement store. Some literature suggests that acetone has resulted in the whitest brands.
Liquid nitrogen can be purchased from artificial insemination or welding supply companies and is more expensive, but is far more efficient and maintains its cold temperature better. It is, however, less forgiving than dry ice and alcohol in that, if the brand is held on for too long, it can produce a scar comparable to a hot brand burn.
DIY or Hire a Pro?
Freeze branding can be rather inexpensive and not terribly time consuming for anyone who wants to handle the task on their own, but it turns out there is a way to take all the guesswork out of it: Hire a professional. For anywhere between $35 (plus sedation costs at Countryside Vet) to $100 a horse ($50 per head for more than five with Young Dental) you can afford years of regular experience that most of us will never acquire.
Pros and Cons
Beyond the law—which varies immensely state-to-state and remains the owner’s responsibility to know and understand—freeze branding your horse offers many of the same benefits pitched by Dr. Farrell and his team in 1966.
To start, the brand, once grown in, can be seen and remains legible from a distance year-round without having to scar the hide. And, though there are many states that don’t consider a horse’s freeze brand an official mark of ownership (separate from the state’s position on whether registration is required), it is inarguable that a documented brand can play (and has played) a hefty role in identifying a missing or stolen horse.
Of course, regardless of the type of brand (hot or cryogenic), the branding system isn’t without its challenges. Because registries are handled by state and, in Texas, by county, it’s very unlikely that your brand is totally unique and there is no national database in which to compare your horse’s brand to the others should said horse cross state or county lines without you. Additionally, there are no shortage of unregistered brands, which may further complicate the process of getting your horse back.
But, in truth, a freeze brand for horse owners plays a much larger role than functioning simply as a form of identification. Instead, particularly in the roping world, a freeze brand has become representative of something much more.
What on the surface looks like a standard mark can instead communicate to onlookers which breeding program that horse came from, who trained it, who won on it. A well-known freeze brand can carry clout, and it can also be used simply to let people know that the perfectly scoring piece of horseflesh beneath you is, in fact, yours. It’s a source of immense pride for many, and, when done well, it looks pretty sharp to boot.


